

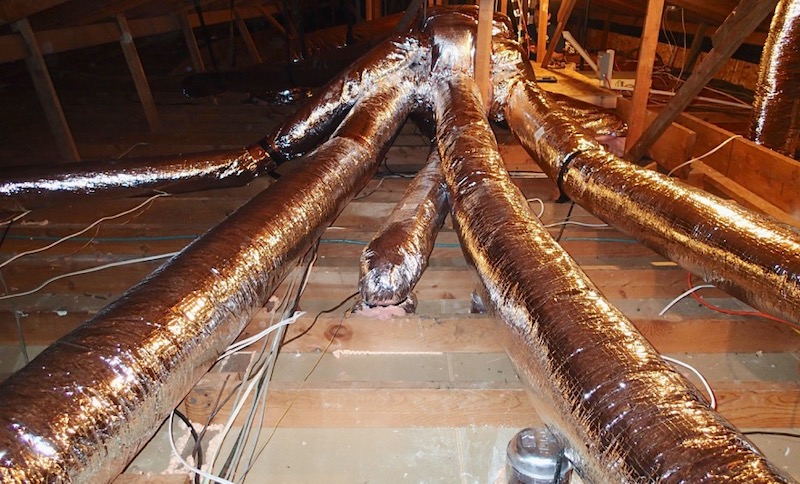
If your air conditioner seems to run forever yet bedrooms still feel stuffy by late afternoon, your attic may be the real culprit. In many homes, the biggest comfort problems begin above the ceiling—where heat-soaked roof decks, thin or disturbed insulation, and leaky supply and return ducts quietly rob cooling capacity. Before assuming the equipment is undersized or worn out, it pays to look at how air moves through ductwork in a 120-degree attic, how well the ceiling is insulated and air-sealed, and how return air gets back to the air handler. Addressing those details often restores even temperatures, shortens runtimes, and makes a future equipment upgrade perform to its ratings rather than fight an upstream loss. While optimize ductwork and attic insulation helps maintain summer cooling, managing full-year HVAC efficiency also means keeping heating components in good working order before colder weather sets in. Homeowners looking to address heating issues or maintain overall system performance can find details on routine mechanical inspections that ensure reliable operation across every season.
Duct leaks in a hot attic cut capacity and create comfort complaints.
Every cubic foot of conditioned air that escapes from a supply seam or loose boot into the attic is capacity you paid for but never feel. Return leaks can be worse, pulling superheated, dusty attic air into the system and sending it across the evaporator coil. That lowers airflow, drives up temperature split, and can push the blower and compressor harder than necessary. A careful visual inspection, followed by sealing joints with UL 181 mastic, taping with UL 181 foil-backed tape (not cloth duct tape), and rewrapping with R-8 duct insulation is a high-value fix. For details on arranging a duct inspection or attic evaluation, homeowners can learn more about Atticman Heating and Air Conditioning, Insulation.
Consider a common scenario: a flex duct is pinched over a truss, the boot is loose at the drywall, and a return plenum seam is open. The far room runs warm, while the thermostat near the return looks okay. You may hear whistling at registers, feel weak supply airflow, and see dust streaks at grille edges. Sealing the return, unkinking and restrapping the flex, and foaming the boot-to-drywall gap often delivers an immediate comfort improvement without touching the outdoor unit. It also protects the evaporator coil from debris that can clog fins and lower system airflow. Beyond simple visual checks, addressing persistent airflow restrictions or complex ductwork layout issues often calls for experienced mechanical evaluation. Working with qualified local professionals like [Gerard Heating and Air](https://urlgeni.us/google_places/HVAC-Contractor-North-Bend-OH-AC-Repair) can help pinpoint system bottlenecks and ensure duct modifications support long-term energy efficiency and balanced indoor comfort.
Insulation and air sealing set the HVAC load before you size equipment.
Equipment sizing follows the building’s heat gain and loss, not the other way around. A Manual J load calculation assumes specific R-values and air leakage rates. If your attic insulation is thin, patchy from past work, or missing over recessed lights and chases, your summer sensible load spikes. Adding blown-in cellulose or fiberglass to reach a higher, continuous R-value and air-sealing top plates, can lights (IC-rated), electrical penetrations, and open chases with foam or caulk reduces the load the AC must handle. Don’t overlook the attic hatch; weatherstrip it and add an insulated cover so the largest “door” to the attic is not an energy leak.
This sequence matters: seal first, then insulate, then evaluate equipment. Right-sizing after envelope upgrades prevents oversizing that can lead to short cycling and uneven temperatures. A variable-speed or two-stage system can mask some issues by running at lower capacity. Still, it cannot overcome a ceiling acting like a radiant heater or a return pulling attic air. Fix the shell and airflow, and even a basic single-stage unit often performs more consistently. When the building is tighter and better insulated, airflow tuning and balancing dampers can distribute cooling more evenly across the longest runs.
Attic heat management has limits: radiant barriers and ventilation.
Radiant barriers stapled under rafters can reduce attic radiant heat, and clear soffit-to-ridge ventilation paths help move hot air out. Baffles keep insulation from blocking soffit vents, and an unobstructed ridge or passive roof vent provides an exit path. These measures help, but they don’t replace insulation or air sealing. A shiny foil barrier won’t stop ceiling air leaks around can lights, and extra venting won’t compensate for missing batts over a hallway or unsealed duct seams. They work best as part of a package that starts with stopping air leaks and achieving uniform ceiling R-value.
Be cautious with powered attic fans. A large gable fan can depressurize the attic and, through leaks, the house below. In practice, that may pull conditioned air out of living spaces and even backdraft open-combustion appliances. If you experimented with a powered fan and noticed higher bills or more dust, the fan may be pulling indoor air through ceiling gaps rather than just exhausting attic heat. Focus first on sealing the ceiling plane and ducts, then consider passive ventilation improvements or a radiant barrier if the roof assembly suits it. Addressing airflow restrictions and attic heat issues helps create a balanced indoor environment while lowering energy waste. Beyond simple sealing projects, maintaining overall performance often depends on having a dependable hvac setup that effectively manages air distribution throughout the entire house during extreme weather conditions. Keeping all components operating in sync ensures consistent indoor comfort and prevents unnecessary strain on your equipment over time.
Return air paths, filter choices, and room pressure shape airflow.
Even with tight ducts and solid insulation, comfort suffers when return air cannot get back to the air handler. Closed-door bedrooms supplied only by a supply register end up positively pressurized, which reduces supply airflow and increases outdoor infiltration. Simple fixes include a larger undercut at the door combined with a transfer grille in the wall or a jumper duct connecting the room to a hall return. After changes, measuring external static pressure with a manometer helps verify the system is operating near the manufacturer’s recommended range rather than fighting excessive resistance.
Filters and grilles matter too. A high-MERV filter in a thin, 1-inch slot can choke airflow and raise static pressure; a deeper media cabinet spreads resistance over a larger surface area and keeps filtration while protecting airflow. Avoid closing supply registers to “force” air elsewhere—this raises pressure, boosts noise, and can cause air to leak at the weakest duct seams. Also, look for sharp bends and crushed sections in flex duct; gentle sweeps and proper strapping reduce friction and deliver more air to the rooms you care about. Addressing restriction points along duct runs helps improve airflow throughout the home. When airflow remains constrained even after straightening flex lines, consulting localized business listings can connect homeowners with local technicians to assess duct layout and balance room temperatures effectively. Read more about localized service options to find experienced contractors who evaluate system performance and provide practical home energy solutions.
Fix-first sequence to solve comfort issues before replacing the AC
A practical order prevents chasing symptoms. Start with observations: check supply and return temperatures, note rooms with chronic hot spots, and listen for whistling registers. Move to the attic: straighten and secure flex ducts, seal seams and boots with UL 181 mastic and foam, and rewrap or replace damaged duct insulation. Air-seal the ceiling plane at top plates, chases, and can lights, then add blown-in insulation until depth is uniform. Weatherstrip the attic hatch and verify bath and kitchen fans vent outdoors. Balance dampers to favor longer runs, and only then assess blower speed, refrigerant charge, and thermostat programming. In many homes, a bonus room over a garage or a far bedroom cools reliably after a transfer grille and duct sealing—no equipment swap required.
When cooling falls short, starting in the attic protects your budget and any future equipment decision. Tight ducts keep delivered capacity high. Air-sealing and uniform insulation reduce the load so your system can run steadily instead of sprinting and stalling. Reliable return paths and sensible filtration preserve airflow and comfort in closed-door rooms. Together, these steps make the most of the system you already own and lay a solid foundation for whichever unit you choose next. The payoff is simple: more even temperatures, quieter operation, and fewer surprises on the hottest afternoons.

