

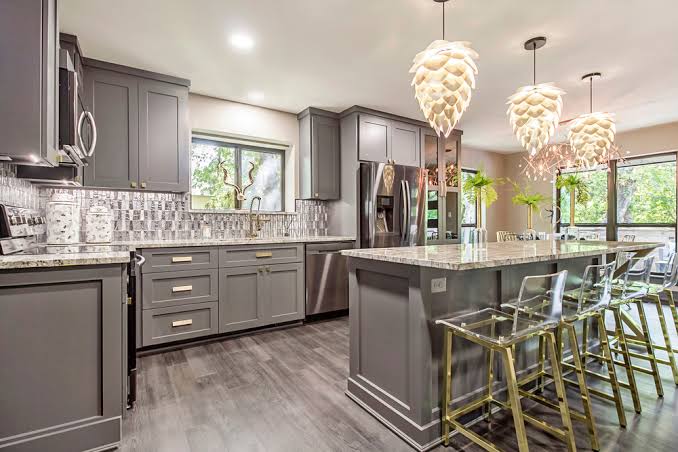
Cabinet painting is one of the most effective ways to refresh the appearance of a kitchen, bathroom, laundry room, or other storage area without the expense and disruption of completely replacing the cabinetry. Cabinets often occupy a significant amount of visual space, so changing their color can dramatically transform the character of an entire room. Whether the goal is to create a brighter appearance, introduce a modern color scheme, restore worn surfaces, or coordinate existing cabinets with a redesigned interior, a carefully planned painting project can produce impressive results.Although painting cabinets may appear to be a simple weekend project, achieving a smooth, durable, professional-looking finish requires considerably more preparation than painting an ordinary wall. Cabinets are exposed to fingerprints, grease, moisture, cleaning products, temperature changes, and frequent handling. Because of this, the paint needs to adhere properly and withstand regular use. Surface preparation, cleaning, sanding, priming, paint selection, application techniques, drying time, and final protection all contribute to the quality of the finished result. Understanding each stage of the process can help homeowners avoid common mistakes and achieve a finish that looks attractive while remaining durable.
Understanding the Benefits of Cabinet Painting
One of the primary advantages of painting cabinets is that it can dramatically change a room without requiring a complete renovation. Replacing cabinetry can involve significant material, labor, demolition, and disposal costs, while painting allows existing cabinets to remain in place. If the cabinet boxes and doors are structurally sound, a new finish may provide the visual transformation the room needs.Painting also offers considerable design flexibility. Cabinets can be changed from dark to light colors, from traditional wood tones to contemporary shades, or from one neutral color to another. This makes it easier to coordinate cabinetry with countertops, flooring, backsplashes, walls, hardware, and appliances.Another advantage is the ability to personalize the space. Instead of accepting the limited color choices available with replacement cabinets, homeowners can select a shade that fits their specific design preferences. A carefully chosen color can make a room feel brighter, larger, warmer, more sophisticated, or more contemporary.Cabinet painting can also extend the visual life of older cabinetry. Even when cabinets have become scratched, faded, stained, or outdated, a high-quality finish can make them appear significantly newer. However, painting is most effective when the underlying cabinets remain structurally sound. Cabinets with severe water damage, major warping, extensive deterioration, or serious structural defects may require more extensive repairs or replacement.
Preparing Cabinets Before Painting
Preparation is arguably the most important part of any cabinet painting project. Paint will not adhere properly to a surface that is covered in grease, dust, wax, polish, or other contaminants. Even small amounts of residue can interfere with adhesion and cause peeling, cracking, or uneven results.The preparation process generally begins by removing cabinet doors, drawers, and hardware. Labeling each component as it is removed can make reassembly much easier later. Doors and drawers should be placed on a clean, stable surface where they can be prepared and painted without being damaged.The cabinet surfaces should then be thoroughly cleaned using an appropriate degreasing solution. Kitchen cabinets in particular can accumulate cooking oils and residue over time, even when they appear relatively clean. These contaminants can prevent primer and paint from bonding properly.After cleaning, the surfaces should be allowed to dry completely. Depending on the existing finish, light sanding may then be necessary to create a suitable surface for primer. The purpose of sanding is not necessarily to remove every trace of the original finish. Instead, it can help smooth imperfections and create enough surface texture for the new coating to adhere effectively.
Repairing Imperfections Before Painting
Painting cannot hide every type of cabinet damage. Dents, holes, deep scratches, damaged edges, loose joints, and other imperfections should be addressed before the final finish is applied. Otherwise, these defects may remain visible or become even more noticeable after painting.Small holes from old hardware can often be filled with an appropriate wood filler or patching product. Scratches and minor dents may also be repaired before sanding. Once the repair material has dried, it should be sanded smooth so that the repaired area blends with the surrounding surface.Cabinet doors should also be checked for loose joints or damaged components. Painting over a structurally unstable door will not solve the underlying problem. If a cabinet door does not close properly, the issue should be addressed before painting.Repairing imperfections at the preparation stage helps produce a smoother and more professional final appearance. Taking extra time before applying primer is usually much easier than trying to correct visible defects after the paint has dried.
Choosing the Right Primer
Primer plays an important role in cabinet painting because it creates a suitable foundation for the final coating. It can improve adhesion, help cover the existing finish, reduce the visibility of certain stains, and create a more uniform surface.The appropriate primer depends on the existing cabinet material and finish. Wood, laminate, previously painted surfaces, and glossy finishes may require different preparation and primer approaches. Some surfaces can be challenging for paint adhesion, so selecting a primer designed for the specific material is important.A quality primer can also help prevent wood tannins or existing discoloration from affecting the new color. This can be especially important when applying a light-colored finish over a darker or heavily stained surface.Primer should be applied evenly and according to the manufacturer’s instructions. Allowing sufficient drying time is important because applying paint too soon can affect the final finish. The goal is to create a stable, smooth foundation before the final coats are applied.
Selecting the Right Cabinet Paint
Not all paints are equally suitable for cabinets. Because cabinets are handled frequently and exposed to moisture, grease, and cleaning, the paint should provide good durability and resist everyday wear.Many cabinet projects use specialized water-based coatings, acrylic formulations, alkyd-modified paints, or other products designed for high-use surfaces. The ideal product depends on the material, application method, desired appearance, and environmental conditions.Sheen also matters. Satin and semi-gloss finishes are commonly considered practical because they offer a balance between appearance, cleanability, and durability. Very glossy finishes can highlight surface imperfections, while extremely flat finishes may be more difficult to clean.The color should be considered in relation to the rest of the room. White and other light neutrals can create a bright, open appearance, while darker colors can add contrast and visual depth. Soft greens, blues, grays, creams, and other contemporary shades can create different moods depending on the surrounding materials.Before committing to a color, testing a small sample on an inconspicuous area can be useful. Lighting conditions can significantly affect how a color appears throughout the day.
Painting Cabinet Doors and Drawers
Cabinet doors and drawers require careful handling because they are highly visible and frequently touched. They should ideally be painted on a clean, level surface where dust and debris are minimized.Using the correct application method can make a significant difference. Brushes may be useful for detailed areas, while high-quality rollers can produce a smooth finish on larger flat surfaces. Spraying can create an especially uniform appearance when performed correctly, although it requires appropriate equipment, preparation, ventilation, and technique.Multiple thin coats are generally preferable to one very thick coat. Heavy application can lead to drips, runs, uneven drying, and visible texture. Thin, controlled coats allow the paint to build gradually while reducing the likelihood of defects.Each coat should be allowed to dry according to the product’s instructions before another coat is applied. Rushing the process can cause problems with adhesion and durability. Patience during the application stage is one of the simplest ways to improve the final result.
Painting Cabinet Frames
The cabinet frames remain in place during many painting projects, so they require careful preparation and application. Surrounding walls, countertops, floors, appliances, and fixtures should be protected from dust and paint.The same preparation principles apply to the frames: clean thoroughly, repair imperfections, sand as appropriate, prime, and apply the finish carefully. Special attention should be given to corners, edges, seams, and areas around hinges because uneven paint accumulation can become noticeable when doors are reinstalled.Working systematically can help maintain consistency. It is often easier to complete one section at a time while keeping track of which areas have received primer and each subsequent coat.
Avoiding Common Cabinet Painting Mistakes
One of the most common mistakes is insufficient cleaning. A surface may look clean but still contain oils and residues that interfere with adhesion. Proper cleaning should therefore never be skipped.Another common mistake is failing to prepare a glossy surface. Paint generally has difficulty adhering to extremely smooth finishes without appropriate preparation. Light sanding and a suitable bonding primer can improve adhesion when required.Applying excessive amounts of paint is another problem. Thick layers may look attractive when wet but can develop drips, brush marks, or uneven surfaces as they dry. Applying controlled coats and allowing adequate drying time usually produces better results.Reinstalling doors too quickly can also damage the finish. Paint may feel dry to the touch while remaining soft underneath. Allowing sufficient curing time helps reduce the chance of fingerprints, sticking doors, scratches, and other early damage.Finally, using low-quality brushes, rollers, or spray equipment can affect the finish. The quality of the application tools should be appropriate for the desired result.
Protecting the Surrounding Area
A successful cabinet painting project requires careful protection of the surrounding environment. Paint can easily reach countertops, floors, walls, appliances, sinks, and other nearby surfaces if they are not adequately covered.Drop cloths, masking materials, plastic sheeting, and other protective products can help limit accidental splashes and overspray. When spraying is used, preparation becomes even more important because fine paint particles can travel farther than expected.The work area should also have adequate ventilation, particularly when using products that produce strong fumes. Following the manufacturer’s safety instructions is essential, including recommendations regarding ventilation, protective equipment, drying conditions, and application.Keeping the work area clean throughout the project can also improve the final finish. Dust and debris can settle onto wet paint and create unwanted texture. A clean environment therefore contributes to a smoother appearance.
Considering Hardware During a Cabinet Update
Cabinet hardware can have a major influence on the final appearance. Handles, knobs, and pulls may look outdated even after the cabinets have been freshly painted. Replacing hardware can therefore provide an additional visual improvement without requiring major changes.Hardware should be selected based on both appearance and functionality. The finish can complement faucets, lighting fixtures, appliances, and other metal elements in the room. However, matching every finish exactly is not always necessary if the overall combination is intentional.When changing hardware sizes or locations, old holes may need to be filled and new ones drilled. These modifications should be completed before the final painting stage whenever possible so that repairs are not visible through the finished coating.
Professional Cabinet Painting Versus DIY Projects
Some homeowners choose to paint cabinets themselves, particularly when the project is relatively small and they have the necessary time, tools, and patience. DIY painting can reduce labor costs, but it also requires careful preparation and a significant time commitment.Professional cabinet painters typically have experience with surface preparation, product selection, spray application, finish consistency, and efficient project organization. They may also have specialized equipment that can produce a smoother and more uniform finish than conventional brushes and rollers.Professional work can be particularly valuable when cabinets have complex profiles, difficult existing finishes, extensive damage, or a large number of doors and drawers. The final decision depends on the project’s size, desired quality, available time, and homeowner’s comfort with the work involved.Regardless of who performs the painting, preparation remains essential. Professional equipment cannot compensate for a surface that has not been properly cleaned, repaired, and prepared.
Maintaining Newly Painted Cabinets
Once the painting project is complete, proper maintenance can help preserve the finish. Cabinets should be cleaned with products that are appropriate for the coating and material. Harsh chemicals, abrasive pads, and aggressive scrubbing can gradually damage the finish.Spills should be cleaned promptly, especially around sinks and areas exposed to moisture. Excess water should not be allowed to remain on cabinet edges or seams for extended periods.Hardware should also be checked periodically to ensure that screws and fittings remain secure. Loose hardware can place unnecessary stress on painted surfaces and may cause premature wear.It is normal for cabinet finishes to experience some wear over time, particularly on frequently handled doors and drawers. However, proper cleaning and careful use can help maintain their appearance for many years.
How Cabinet Painting Can Transform a Room
One of the most appealing aspects of cabinet painting is the dramatic visual change it can create without completely redesigning a room. Changing dark cabinets to a lighter shade can make a space feel brighter and more open. A bold color can create a strong focal point, while a neutral finish can provide a timeless background for other design elements.Paint can also help unify mismatched cabinetry. If different cabinet components have slightly different finishes or colors, a carefully selected paint color can create a more cohesive appearance.The transformation can be especially effective when cabinet painting is combined with relatively small updates such as new hardware, improved lighting, a backsplash refresh, or updated accessories. These complementary changes can create the impression of a much larger renovation while keeping the existing cabinetry.
Final Thoughts on Cabinet Painting
Cabinet painting offers a practical way to refresh an interior without the expense and disruption associated with complete cabinet replacement. When the existing cabinets are structurally sound, a carefully applied new finish can dramatically improve their appearance and give the room a renewed sense of style.The quality of the final result depends heavily on preparation. Thorough cleaning, appropriate sanding, surface repairs, proper priming, suitable paint selection, controlled application, and adequate drying and curing time are all essential. Skipping any of these steps can reduce durability and create visible imperfections.Homeowners should also consider the environment in which the cabinets will be used. Kitchens and bathrooms expose cabinets to moisture, grease, cleaning products, and frequent handling, so choosing a durable coating and maintaining it properly is important for long-term performance.Whether the project is completed as a DIY renovation or by a professional, careful planning can make a substantial difference. Choosing the right color, finish, hardware, and application method can turn tired cabinetry into an attractive focal point while preserving the underlying structure.Ultimately, cabinet painting is more than simply applying a new color. It is a detailed process that combines preparation, design, material selection, craftsmanship, and maintenance. When each stage is handled properly, painted cabinets can provide a fresh, durable, and cost-effective way to transform the look and feel of a home.

